
Getting started
Install the app, grant it microphone access, create a project, record your first paragraph, merge the take, and export. This is the entire workflow in one walkthrough. Just a few minutes from a fresh install to a finished file.
1. Install
VoiceOverAndOver runs on Windows 10 and 11 and on macOS 11 (Big Sur) and newer. The Mac build is a universal binary that runs natively on both Intel and Apple Silicon. Both installers bundle their own copy of ffmpeg, so you do not need to install anything else.
Windows
- Download
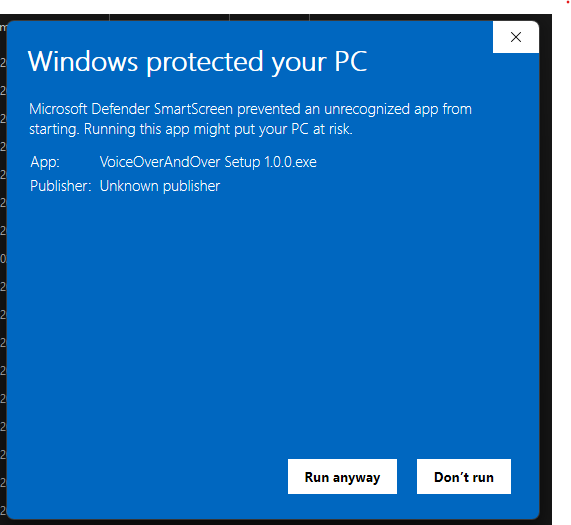
VoiceOverAndOver Setup <version>.exefrom the Download page. - Double-click the installer. If Windows SmartScreen warns that the publisher is unknown, click More info, then Run anyway. (See the troubleshooting page for context on why.)
- Follow the installer prompts. The default install location is fine.
macOS
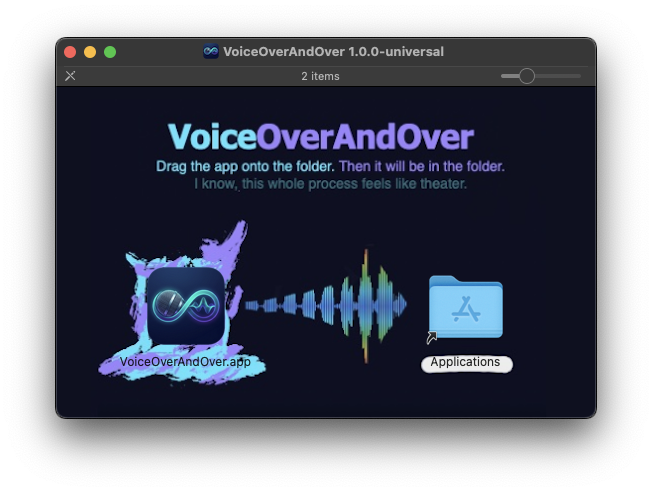
- Download
VoiceOverAndOver-<version>.dmgfrom the Download page. - Double-click the DMG to mount it.
- Drag the VoiceOverAndOver app into the Applications folder.
- Eject the DMG and launch the app from Applications or Launchpad.
On macOS the app is signed with a Developer ID certificate and notarized by Apple, so Gatekeeper opens it without warnings. On Windows the installer is currently unsigned - that is the SmartScreen prompt you may see on first run.
2. First launch and microphone permission
The first time you launch the app you will see an empty Projects screen with a "No projects yet" message. That is normal. Nothing is broken.

The app does NOT ask for microphone permission at launch. It only asks the first time you click Record on a paragraph row in the Editor. When that happens, your operating system will pop a permission prompt:
- Windows - the permission dialog comes from Settings > Privacy > Microphone. Click Yes to allow.
- macOS - the prompt is from System Settings > Privacy & Security > Microphone. Click OK to allow.
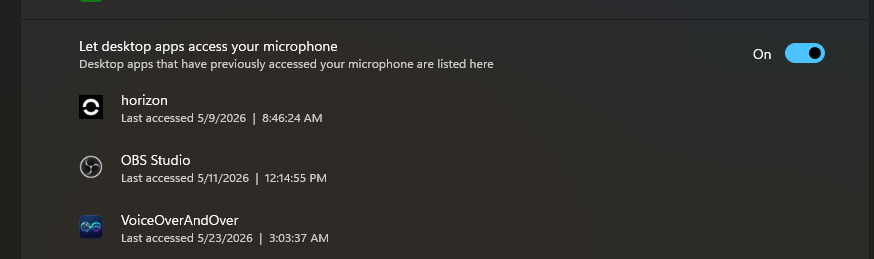
The app cannot re-prompt automatically. You have to grant access manually in your OS settings, then restart the app. See the troubleshooting page for the exact paths.
3. Create your first project
Click + New project on the Projects screen. The New Project screen has two fields:
- Project name. Anything you want. This becomes the title at the top of the Editor and the default base name for your exported files.
- Script. Paste in your text, or drag a
.txtor.mdfile onto the textarea. The app splits the text into paragraphs: every non-empty line becomes one paragraph (one recordable row). Blank lines are dropped.
Click Create project. The app opens the Editor with one empty row per paragraph.
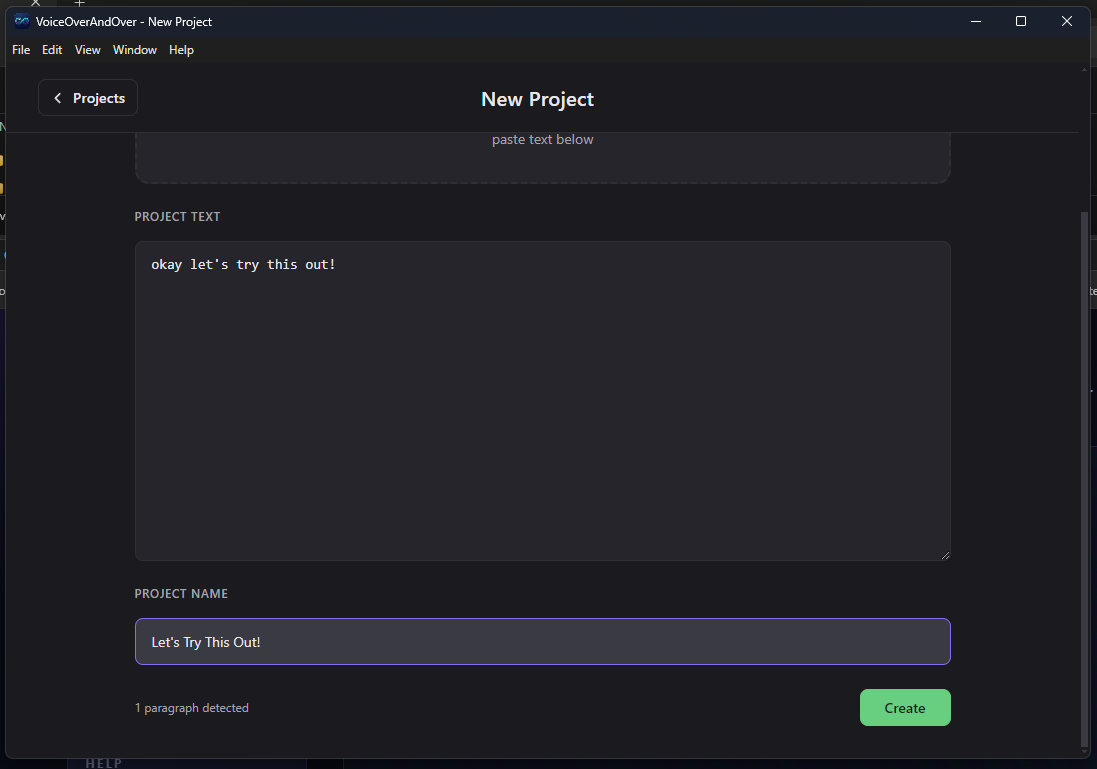
One sentence per line is fine. Three sentences on one line is also fine. The line break is what controls the split - so if you want a pause between sentences while recording, put them on separate lines. If you want to read them as one continuous thought, leave them on the same line.
4. Record your first paragraph
Each paragraph row has the text on the left and a small audio area on the right with one big Record button. Click it.
- If this is your first recording on the machine, grant microphone permission when the OS prompts you (see step 2 above).
- Read the paragraph aloud.
- Click Stop. The row now shows a colorful waveform of the take, plus the take duration.
- Click Play to hear it back. If it sounds good, move to the next row. If not, click Re-record and try again.

If you flub a line in the middle of a long take, you do not start over from the top. You re-record only the row you flubbed. Your other paragraphs are untouched. That is the entire reason this app exists.
Repeat for every paragraph in the script. You can record them in any order - the merge step assembles them in the order they appear on screen, not the order you recorded them.
5. Polish, if you want to
The Editor has a few optional controls you can use to tighten a take after you record it. They are all explained in detail on the Editor screen page; the short version:
- Crop. Drag the two handles on either end of a waveform inward to trim silence off the start or end of the take.
- Gain slider. The vertical slider on the left of each waveform boosts that one paragraph by up to +10 dB. Useful if one take came out quieter than the others.
- Drag to reorder. Grab a row by its left edge and drag it up or down. The merge respects the new order automatically.
- Insert New Item. On any recorded row, click the small plus icon on the far right to add an empty paragraph after it.
- Delete. The trash icon on the far right removes a row permanently (after a red-confirm dialog).
- Import audio. If you already have a take recorded somewhere else, click Import... on a row to use that file instead of the one you just recorded.
6. Merge and export
Once every paragraph has a recording, the Merge button at the top of the Editor lights up. Click it.
The Merge screen automatically stitches every paragraph into one preview waveform in the order they appear in the Editor. There is nothing you have to click to start the merge - it runs as soon as the screen opens. When the preview waveform appears, the merge is done.

Below the preview, the Export options block has one toggle: "Merge all audio tracks into one". Leave it ON to export a single combined file (the usual case). Turn it OFF to export each paragraph as its own numbered file (useful if you are dropping the stems into a DAW or NLE for layered editing).
Click Export. Choose WAV for a lossless master, or MP3 for a smaller file that uploads quickly. Pick a folder, give the file a name, and confirm. The status panel at the bottom of the screen turns green and prints "Success!" with a timestamp.
That is the whole workflow. You can close the app at any time and your project is saved automatically.
What to read next
If you want the per-control reference for any screen, the sidebar has one page per screen. The two most useful follow-ups for new users:
- Editor screen - every control on the recording screen, including the ones not covered in this walkthrough.
- Captions and markers - how to get SRT subtitles, Premiere markers, and an Audacity label track out of the same export pass.